
Writing BizTalk context properties to a message from a WCF service using behaviors
The new WCF adapter in BizTalk 2006 R2 offers a lot of new possibilities. One of those is to write data to the BizTalk Message context properties directly from an exposed WCF Service. A practical use of this technic could be to write the username from the Windows credentials of the calling client into the context of the BizTalk message. This could be useful as this information is encrypted in messages that are received via the WCF adapter and isn’t possible to read when inside BizTalk. I’ll try and demonstrate the technique in this post.
If you have used the SOAP adapter before you might know that all you had to do was to turn on Windows based security for the exposed SOAP service and the username was automatically promoted to the context of the incoming BizTalk message. That username could then be used for routing, tracking which user called the service or using the value in plain text when communicating further to other connected systems. However using the WCF adapter this is not true anymore - when using the new WCF Message Security model the username and password is encrypted in the message and once the message is received by BizTalk it’s to late to read it. Basically we have to read the username in the actual service and write it into our own context property (that doesn’t get encrypted).
One way of achieving this is to read the username in the service and then to add it to the WCF Message Headers. All WCF message headers will by default be written to a the BizTalk Message context property called InboundHeaders (in the http://schemas.microsoft.com/BizTalk/2006/1/Adapters/WCF-properties namespace). First we’ll create an EndpointBehavior that will use a MessageInspector to add the username to the message header. Finally we create BehaviorExtensionElement so we can use a WCF Custom Binding in BizTalk and configure it to add our new behavior.
Creating the new EndpointBehavior
To create the configurable behavior we’ll need the three classes we mentioned above.
-
A class that implements the IDispatchMessageInspector interface to handle to reading and writing to the actual message.
-
A class that implements the IEndpointBehavior interface to define what kind of endpoint we’re creating and what it should do.
-
A class that implements the BehaviorExtensionElement abstract class to create the behavior and make it configurable.
<div><span style="color: #0000ff">using</span><span style="color: #000000"> System;
</span><span style="color: #0000ff">using</span><span style="color: #000000"> System.Collections.Generic;
</span><span style="color: #0000ff">using</span><span style="color: #000000"> System.Text;
</span><span style="color: #0000ff">using</span><span style="color: #000000"> System.ServiceModel;
</span><span style="color: #0000ff">using</span><span style="color: #000000"> System.ServiceModel.Channels;
</span><span style="color: #0000ff">using</span><span style="color: #000000"> System.ServiceModel.Dispatcher;
</span><span style="color: #0000ff">using</span><span style="color: #000000"> System.ServiceModel.Description;
</span><span style="color: #0000ff">using</span><span style="color: #000000"> System.ServiceModel.Configuration;

</span><span style="color: #0000ff">namespace</span><span style="color: #000000"> CustomWCFProperties.Behavior
{
    </span><span style="color: #808080">///</span><span style="color: #008000"> </span><span style="color: #808080"><summary></span><span style="color: #008000">
    </span><span style="color: #808080">///</span><span style="color: #008000"> PromoteUserNameMessageInspector implements IDispatchMessageInspector and adds the name from the WindowsIdentity to a WCF header called WindowsUserName in the </span><span style="color: #008000; text-decoration: underline">http://CustomWCFProperties.Schema</span><span style="color: #008000"> namespace. BeforeSendReply only returns as we're not interested in handling the response.
    </span><span style="color: #808080">///</span><span style="color: #008000"> </span><span style="color: #808080"></summary></span><span style="color: #808080">
</span><span style="color: #000000">    </span><span style="color: #0000ff">public</span><span style="color: #000000"> </span><span style="color: #0000ff">class</span><span style="color: #000000"> PromoteUserNameMessageInspector : IDispatchMessageInspector
    {
        </span><span style="color: #0000ff">#region</span><span style="color: #000000"> IDispatchMessageInspector Members</span><span style="color: #000000">

        </span><span style="color: #0000ff">public</span><span style="color: #000000"> </span><span style="color: #0000ff">object</span><span style="color: #000000"> AfterReceiveRequest(</span><span style="color: #0000ff">ref</span><span style="color: #000000"> System.ServiceModel.Channels.Message request, System.ServiceModel.IClientChannel channel, System.ServiceModel.InstanceContext instanceContext)
        {
            </span><span style="color: #0000ff">string</span><span style="color: #000000"> windowsUserName </span><span style="color: #000000">=</span><span style="color: #000000"> ServiceSecurityContext.Current.WindowsIdentity.Name;
            request.Headers.Add(MessageHeader.CreateHeader(</span><span style="color: #000000">"</span><span style="color: #000000">WindowsUserName</span><span style="color: #000000">"</span><span style="color: #000000">, </span><span style="color: #000000">"</span><span style="color: #000000">http://CustomWCFProperties.Schema</span><span style="color: #000000">"</span><span style="color: #000000">, windowsUserName));
            </span><span style="color: #0000ff">return</span><span style="color: #000000"> </span><span style="color: #0000ff">null</span><span style="color: #000000">;
        }

        </span><span style="color: #0000ff">public</span><span style="color: #000000"> </span><span style="color: #0000ff">void</span><span style="color: #000000"> BeforeSendReply(</span><span style="color: #0000ff">ref</span><span style="color: #000000"> Message reply, </span><span style="color: #0000ff">object</span><span style="color: #000000"> correlationState)
        {
            </span><span style="color: #0000ff">return</span><span style="color: #000000">;
        }

        </span><span style="color: #0000ff">#endregion</span><span style="color: #000000">
    }

    </span><span style="color: #808080">///</span><span style="color: #008000"> </span><span style="color: #808080"><summary></span><span style="color: #008000">
    </span><span style="color: #808080">///</span><span style="color: #008000"> PromoteUserNameBehavior implements IEndpointBehavior and adds a message inspector to the dispatch behavior. Doesn't use any binding parameters, doesn't validate any configuration etc and can't be used in a client (only in a service).
    </span><span style="color: #808080">///</span><span style="color: #008000"> </span><span style="color: #808080"></summary></span><span style="color: #808080">
</span><span style="color: #000000">    </span><span style="color: #0000ff">public</span><span style="color: #000000"> </span><span style="color: #0000ff">class</span><span style="color: #000000"> PromoteUserNameBehavior : IEndpointBehavior
    {
        </span><span style="color: #0000ff">#region</span><span style="color: #000000"> IEndpointBehavior Members</span><span style="color: #000000">

        </span><span style="color: #0000ff">public</span><span style="color: #000000"> </span><span style="color: #0000ff">void</span><span style="color: #000000"> AddBindingParameters(ServiceEndpoint endpoint, System.ServiceModel.Channels.BindingParameterCollection bindingParameters)
        {
            </span><span style="color: #0000ff">return</span><span style="color: #000000">;
        }

        </span><span style="color: #0000ff">public</span><span style="color: #000000"> </span><span style="color: #0000ff">void</span><span style="color: #000000"> ApplyClientBehavior(ServiceEndpoint endpoint, System.ServiceModel.Dispatcher.ClientRuntime clientRuntime)
        {
            </span><span style="color: #0000ff">throw</span><span style="color: #000000"> </span><span style="color: #0000ff">new</span><span style="color: #000000"> Exception(</span><span style="color: #000000">"</span><span style="color: #000000">The method or operation is not implemented.</span><span style="color: #000000">"</span><span style="color: #000000">);
        }

        </span><span style="color: #0000ff">public</span><span style="color: #000000"> </span><span style="color: #0000ff">void</span><span style="color: #000000"> ApplyDispatchBehavior(ServiceEndpoint endpoint, System.ServiceModel.Dispatcher.EndpointDispatcher endpointDispatcher)
        {
            endpointDispatcher.DispatchRuntime.MessageInspectors.Add(</span><span style="color: #0000ff">new</span><span style="color: #000000"> PromoteUserNameMessageInspector());
        }

        </span><span style="color: #0000ff">public</span><span style="color: #000000"> </span><span style="color: #0000ff">void</span><span style="color: #000000"> Validate(ServiceEndpoint endpoint)
        {
            </span><span style="color: #0000ff">return</span><span style="color: #000000">;
        }

        </span><span style="color: #0000ff">#endregion</span><span style="color: #000000">
    }

    </span><span style="color: #808080">///</span><span style="color: #008000"> </span><span style="color: #808080"><summary></span><span style="color: #008000">
    </span><span style="color: #808080">///</span><span style="color: #008000"> Defines the behavior.
    </span><span style="color: #808080">///</span><span style="color: #008000"> </span><span style="color: #808080"></summary></span><span style="color: #808080">
</span><span style="color: #000000">    </span><span style="color: #0000ff">public</span><span style="color: #000000"> </span><span style="color: #0000ff">class</span><span style="color: #000000"> PromoteUserNameBehaviorElement : BehaviorExtensionElement
    {
        </span><span style="color: #0000ff">protected</span><span style="color: #000000"> </span><span style="color: #0000ff">override</span><span style="color: #000000"> </span><span style="color: #0000ff">object</span><span style="color: #000000"> CreateBehavior()
        {
            </span><span style="color: #0000ff">return</span><span style="color: #000000"> </span><span style="color: #0000ff">new</span><span style="color: #000000"> PromoteUserNameBehavior();
        }

        </span><span style="color: #0000ff">public</span><span style="color: #000000"> </span><span style="color: #0000ff">override</span><span style="color: #000000"> Type BehaviorType
        {
            </span><span style="color: #0000ff">get</span><span style="color: #000000"> { </span><span style="color: #0000ff">return</span><span style="color: #000000"> </span><span style="color: #0000ff">typeof</span><span style="color: #000000">(PromoteUserNameBehavior); }
        }
    }
}</span></div>
Finally we have to sign the assembly using a strong key and add it to the GAC.
Configure the machine.config
As we need BizTalk and the WCF adapter to pick up the need behavior and make it possible to configure our receive port we need to to add the behavior element to the machine.config. The easiest way of doing this is to use the new WCF Service Configuration Editor tool and point to the machine.config file.
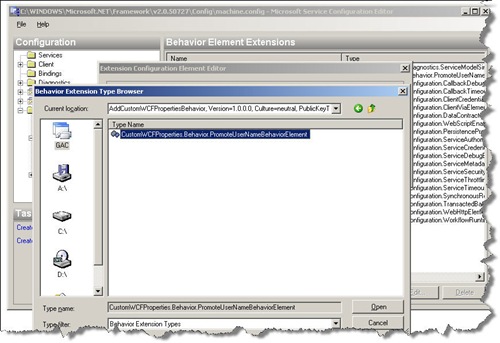
After the dll been added and the machine.config file has been saved the the line below should have been added to the [
<div><span style="color: #0000ff"><</span><span style="color: #800000">add </span><span style="color: #ff0000">name</span><span style="color: #0000ff">="addCustomWCFProperties"</span><span style="color: #ff0000"> type</span><span style="color: #0000ff">="CustomWCFProperties.Behavior.PromoteUserNameBehaviorElement, AddCustomWCFPropertiesBehavior, Version=1.0.0.0, Culture=neutral, PublicKeyToken=705e34637fdffc54"</span><span style="color: #ff0000"> </span><span style="color: #0000ff">/></span></div>
Create the BizTalk Receive Port and Receive Location
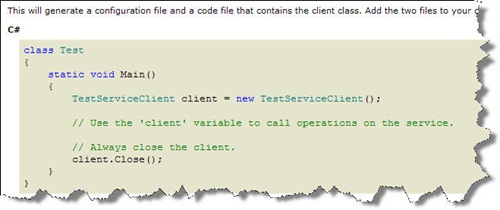
Next thing to do is to start the BizTalk WCF Service Publishing Wizard. Choose to publish a service endpoint and make sure you enable metadata and create a receive location. In this example we’ll next choose to “Publish schemas as WCF service” and then define our service by naming service operations and so on.
When you then browse to the URL you choose to publish your service to you’ll see the nice example of how to instance the service you just defined.
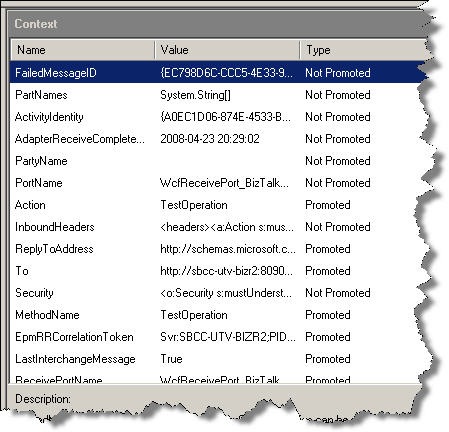
If we then send a request message to service (you’ll find a client as part of the attached solution here) and inspect the message and its context properties in BizTalk we’ll see that the username of the calling client is nowhere to be found.
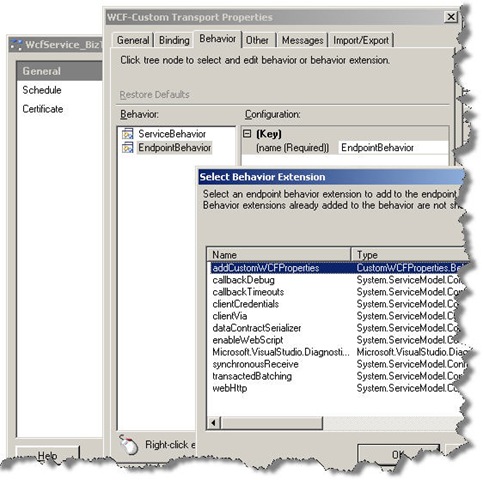
Configure a WCF-Custom binding and adding a Endpoint Behavior
To add the username to the message context we’ll need to add our newly created behavior to our service. We’ll do this by switch the service over to use a WCF-Custom binding to enable configuration. We then need to add the URL in the address field, define the binding type to a wsHttpBinding and to add our addCustomeWCFProperties behavior to the list of endpoint behaviors.
> > [](../assets/2008/04/windowslivewriterwritingbiztalkcontextpropertiestoamessag-72f4note-2.gif) NOTE: there is a limitation in the BizTalk WCF implementation in that you can't create the WCF-Custom receive location that uses a HTTP in-process based binding (like the wsHttpBinding used in a WCF-Custom endpoint is) first and then use the WCF Publishing Wizard to only publish a metadata endpoint. > > > > [Richard Seroter writes about it here](http://www.topxml.com/code/cod-72_10213_biztalk-and-wcf-part-v-publishing-operations-patterns.aspx) and I found the same thing to be true. > > > > _"This error doesn’t have to do with mixing MEX endpoints and “regular” endpoints in the same IIS web site, but rather, creating MEX endpoints for in-process HTTP bindings seems to trigger this. **Note that an IIS-hosted MEX endpoint CAN be created for IIS-hosted HTTP endpoints, but not for in-process hosted HTTP endpoints."**_ > > > > If you however choose a different binding that Http or (as in this case) publishes the metadata first and then switches over to a custom binding you're ok. > >
If we then post another message to the service and inspect the message we’ll see that the behavior actually added a header and that it’s part of our BizTalk context properties. The adapter is also smart enough to know that this header isn’t part of the original headers and therefore stores in it’s own field within the context properties (you’ll find as part of the InboundHeaders block as well).
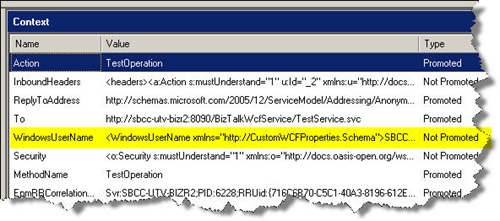
One problem remains - the actual value of the user is nested inside a XML node and the property isn’t promoted.
Extract and promote the value
To extract and promote the value we use an old fashion pipeline component using the following code in the execute method (the complete project is part of the downloadable sample project).
<div><span style="color: #000000">        </span><span style="color: #0000ff">public</span><span style="color: #000000"> IBaseMessage Execute(IPipelineContext pc, IBaseMessage inmsg)
        {
            StringReader reader </span><span style="color: #000000">=</span><span style="color: #000000"> </span><span style="color: #0000ff">new</span><span style="color: #000000"> StringReader(inmsg.Context.Read(</span><span style="color: #000000">"</span><span style="color: #000000">WindowsUserName</span><span style="color: #000000">"</span><span style="color: #000000">, </span><span style="color: #000000">"</span><span style="color: #000000">http://CustomWCFProperties.Schema</span><span style="color: #000000">"</span><span style="color: #000000">).ToString());

            </span><span style="color: #0000ff">if</span><span style="color: #000000"> (reader </span><span style="color: #000000">!=</span><span style="color: #000000"> </span><span style="color: #0000ff">null</span><span style="color: #000000">)
            {
                XPathDocument document </span><span style="color: #000000">=</span><span style="color: #000000"> </span><span style="color: #0000ff">new</span><span style="color: #000000"> XPathDocument(reader);
                XPathNavigator navigator </span><span style="color: #000000">=</span><span style="color: #000000"> document.CreateNavigator();
                </span><span style="color: #0000ff">string</span><span style="color: #000000"> value </span><span style="color: #000000">=</span><span style="color: #000000"> navigator.SelectSingleNode(</span><span style="color: #000000">"</span><span style="color: #000000">/</span><span style="color: #000000">"</span><span style="color: #000000">).Value;
                inmsg.Context.Promote(</span><span style="color: #000000">"</span><span style="color: #000000">WindowsUserName</span><span style="color: #000000">"</span><span style="color: #000000">, </span><span style="color: #000000">"</span><span style="color: #000000">http://CustomWCFProperties.Schema</span><span style="color: #000000">"</span><span style="color: #000000">, value);
            }

            </span><span style="color: #0000ff">return</span><span style="color: #000000"> inmsg;
        }</span></div>
All the component does is reading the XML node the value exists inside and then it reads the actual value. Finally it writes the value back and promotes it. To be able to promote the value we also have to have a Property Schema deployed with a corresponding property name and namespace (WindowsUser and http://CustomeWCFProperties.Schema in this case).
The end results looks something like this.
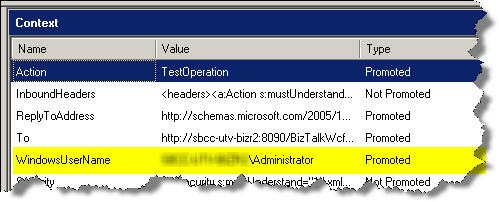
The username is extracted and promoted and available for example for tracking or to for example use in a routing scenario.
This technique could of course be used for all kinds of scenarios where you like to add information to the context properties and could potentially replace a lot of the classic scenarios for custom pipelines.
All kind of comments are of course more than welcome!